
Originally posted 6-11-2014
Make Your Own PVC Bonsai Wire Caddy. DYI Build
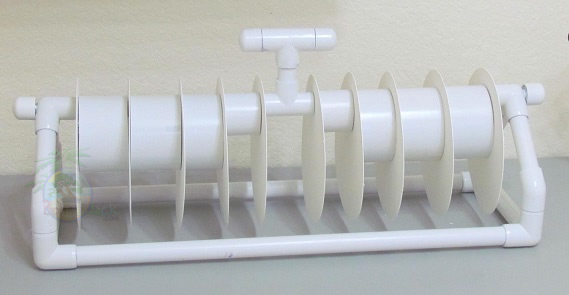
Caddy Assembly
Instructions
Parts needed
|
What |
Quantity |
|
3/4 caps |
4 |
|
3/4 tees |
2 |
|
3/4 45’s |
4 |
|
side |
6 |
|
hilti |
2 |
|
bolts 5/8 |
2 |
|
plates |
10 |
|
2&1/8 |
2 |
|
2&3/4 |
4 |
|
2&1/8 |
2 |
|
1.5″ |
6 |
|
2.5″ |
1 |
|
25.5″ |
2 |
|
12 1/16th |
2 |
|
5″ |
4 |
|
7.5″ |
2 |
|
Imperial |
8 |
We have hundreds of anchors, 45’s and bushings left over from builds. They are available at cost plus shipping. Email [email protected] if you need any.
Its important to dry fit all parts before gluing.
- Press 3/4 caps onto bolt ends to create a round knob
- Mount the drop in anchors into one side of your 12 1/16th inch sections of PVC. This can be done with a hammer and piece of rebar.
- Grind the ends of the 12 1/16th inch sections that contain the drop in anchor so it can easily slide in and out of a side outlet elbow.
- Attach the 12 1/16th inch sections to a 3/4 tee to create the bar that holds the rolls. The anchor ends should not be glued.
- Attach two 2.5″ inch sections of 3/4″ pvc and one 2.5″ inch section of 3/4″ pvc to the remaining tee to create a handle. Attach the end caps to he handle
- Attach the handle to the bar.
- The handle assembly is complete.
- Use a dremel to cut out ten 8.5″ circle dividers from your PVC panel. The PVC panel can be found at Lowes and Home Depot. Lowes Item # is 72405 | Model #: 688840. Its important not to substitute another size of panel as you will have fit issues later on in the build.
- Use a hole saw to cut a 1&1/8th hole into the plates. The hole should be centered at 2 inches in from one edge. Hint. you can cut 20 of these at a time if
you use several clamps.
- Cut these sections of PVC.
|
|
|
- Its difficult but important to get a square cut. A large tile saw works well.
Its virtually impossible to get a square cut with a hack saw.
- Cut these sections of PVC
|
||
|
||
- Now assemble these sections with 4 side outlet elbows to create your base.
This part is tricky and will require fast hands. After you have glued
these sections place the base on a flat surface and make adjustments with
a twisting motion until its perfectly level. You have to work fast.
- Cut these the 5″ inch sections of 3/4″ pvc. Attach two of them to
one side outlet elbow to create an open triangle. Repeat to create your
second triangle. Now attach four 45’s to the exposed ends of the 5″
PVC keeping them perfectly aligned with the direction of the pipe. Attach
four sections of 1.5″ pvc to the exposed ends of the 45’s.
- Attach the base to the triangles you just created.
- Install the rolls and dividers to the caddy. Lightly screw the end caps into place
and measure for horizontal play. If the caddy has horizontal play then
your wire will slip between the dividers and cause problems. Every caddy
will have some play. Measure how much play you have and insert the
bushings to compensate. I have hundreds of these bushings available for 50
cents each, email [email protected] if you need a couple. - If you choose to paint your caddy you will need a spray paint that clearly states
plastic on the label. its a good idea to use acetone to remove most of the
PVC barcodes and text before painting as they will belled through the
paint.
Good luck.
Thanks for posting this. Great of you to share with the bonsai community.